
Solar panel installation is one of the smartest ways to save money on electricity and reduce your carbon footprint. While the idea of setting up a solar energy system may seem complicated, understanding the process step by step makes it much easier. In this guide, we’ll explain the solar panel installation process in simple terms, from preparation to completion, so you can make the switch to clean energy with confidence.
By following this guide, you’ll not only save on energy bills but also gain insights into how to optimize your investment for long-term benefits.
1. Solar Panel Installation: Assess Your Home’s Solar Potential
Before diving into installation, evaluate if your home is suitable for solar panels. Key factors include:
- Sunlight Availability: How much sun does your roof get? South-facing roofs in the UK receive the most sunlight.
- Roof Size and Condition: Ensure your roof is large enough to fit panels and strong enough to support their weight.
- Shading: Check for shading from trees, chimneys, or nearby buildings. Even partial shading can reduce energy output.
If your roof doesn’t meet these criteria, ground-mounted panels might be a better option.
2. Determine Your Energy Needs
Calculate how much energy your household uses to determine the size of the solar system you’ll need.
- Look at your electricity bills for the past 12 months to find your average monthly energy consumption in kilowatt-hours (kWh).
- Decide if you want to cover 100% of your electricity usage or just offset a portion.
For example, if your monthly usage is 900 kWh and you want to cover all of it, you’ll need a system that generates around 11,000 kWh annually (900 kWh x 12).
3. Choose the Right Solar Panels
There are three main types of solar panels:
- Monocrystalline Panels: High efficiency and long lifespan but more expensive.
- Polycrystalline Panels: Affordable but slightly less efficient.
- Thin-Film Panels: Lightweight and flexible but best for low energy needs.
Consider factors like cost, efficiency, and aesthetics when choosing your panels. Monocrystalline panels are often the best choice for residential installations because of their superior performance.
4. Select an Inverter
Solar panels generate direct current (DC) electricity, but your home uses alternating current (AC). An inverter converts DC to AC. There are three main types of inverters:
- String Inverters: Cost-effective and suitable for homes with minimal shading.
- Microinverters: Installed on each panel, improving performance if shading is an issue.
- Power Optimizers: Combine features of string inverters and microinverters for better efficiency.
Choosing the right inverter is crucial for maximizing energy output.
5. Obtain Permits and Approvals
Before installation, you’ll need to obtain necessary permits and comply with local regulations. In the UK, you may require:
- Planning Permission: Generally not needed for most installations unless your property is in a conservation area or you’re installing ground-mounted panels.
- Grid Connection Approval: Required to connect your solar system to the electricity grid under the Microgeneration Certification Scheme (MCS).
Working with a certified installer can simplify this process.
6. Hire a Certified Installer
Even if you’re considering DIY installation, hiring a professional ensures safety and compliance with regulations. Look for an installer who:
- Is certified by MCS.
- Has experience and good customer reviews.
- Offers a warranty for both products and installation services.
A reliable installer will handle the permits, design your system, and ensure proper setup.
7. Prepare Your Roof for Installation
On the installation day, the first step is to prepare your roof. This includes:
- Inspecting the Roof: Ensuring it’s in good condition and capable of supporting the panels.
- Setting Up Mounting Structures: Mounts are installed on the roof to hold the panels securely. They are tilted at the optimal angle for sunlight exposure (usually 30-45 degrees).
The mounting system is the foundation of your solar setup, so it must be robust and durable.
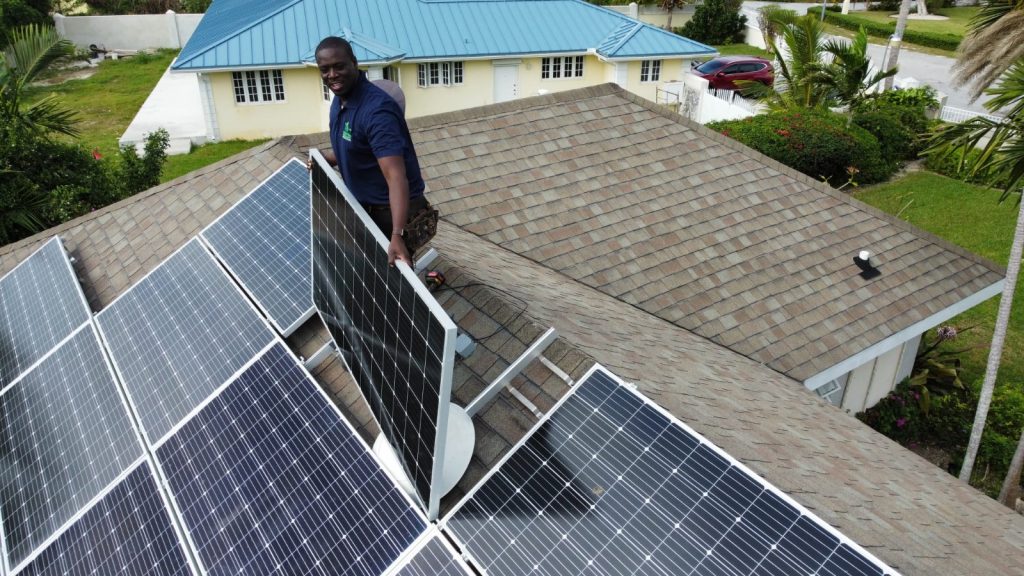
8. Install the Solar Panels
Once the mounting system is in place, the panels are installed.
- Each panel is secured to the mounting structure using clamps or bolts.
- Wiring is connected to form an electrical circuit that will channel energy to the inverter.
This step requires precision to ensure the panels are properly aligned and firmly attached.
Also See: The Future of Solar Energy: Trends and Innovations
9. Connect the Inverter and Electrical System
The inverter is installed and connected to the solar panels and your home’s electrical system.
- For safety, the wiring must be done by a qualified electrician.
- The inverter is usually placed in a cool, shaded location like a garage or utility room to prevent overheating.
After connecting the inverter, it’s linked to the meter, allowing you to track your energy production and usage.
10. Testing and Monitoring
Before turning on the system, a thorough inspection is conducted to ensure everything is functioning correctly.
- The installer will test the connections, wiring, and overall setup.
- Once approved, the system is activated, and you’ll start generating electricity.
For ongoing monitoring, you can use apps or software provided by the inverter manufacturer. These tools help you track energy production, detect issues, and optimize system performance.
11. Set Up Battery Storage (Optional)
If you want to store excess energy for later use, consider adding a battery system.
- Benefits of Battery Storage:
- Store energy for nighttime use.
- Reduce dependency on the grid.
- Maximize savings by using stored energy during peak rate times.
Popular battery options include the Tesla Powerwall and LG Chem Resu.
12. Understand Maintenance Needs
Solar panels require minimal maintenance, but regular checks can help maximize efficiency.
- Clean the Panels: Dust and debris can block sunlight and reduce output. Clean panels at least twice a year.
- Inspect Components: Check for loose wires, damaged mounts, or other issues.
- Monitor Performance: Keep an eye on energy production using your monitoring system.
Most panels come with a warranty of 20–25 years, but inverters may need replacement after 10–15 years.
Conclusion
Installing solar panels is a rewarding journey toward energy independence and environmental sustainability. By understanding each step of the installation process—assessing your roof, calculating energy needs, choosing components, and maintaining your system—you’ll ensure your investment pays off for decades.
With proper planning and professional installation, solar panels can transform your home into a clean energy powerhouse. Follow this guide, and you’ll be well on your way to reaping the benefits of renewable energy.